POWER OF LASER GUN
A HISTORY OF THE LASER
In honor of the laser turning 50, here is a timeline of some of the more
notable scientific accomplishments related to light amplification by
stimulated emission of radiation (laser). An interactive version is
available at www.lasertimeline.com.
The laser would not have been possible without an understanding that
light is a form of electromagnetic radiation. Max Planck received the
Nobel Prize in physics in 1918 for his discovery of elementary energy
quanta. Planck was working in thermodynamics, trying to explain why
“blackbody” radiation, something that absorbs all wavelengths of light,
didn’t radiate all frequencies of light equally when heated.
"Laser light" redirects here. For the song, see LaserLight. For laser light show, see laser lighting display. For other uses, see Laser (disambiguation).

United States Air Force laser experiment

Red (660 & 635 nm), green (532 & 520 nm) and blue-violet (445 & 405 nm) lasers
Fundamentals

Modern telescopes use laser technologies to compensate for the blurring effect of the Earth’s atmosphere.[3]
Temporal (or longitudinal) coherence implies a polarized wave at a single frequency whose phase is correlated over a relatively great distance (the coherence length) along the beam.[4] A beam produced by a thermal or other incoherent light source has an instantaneous amplitude and phase that vary randomly with respect to time and position, thus having a short coherence length.
Lasers are characterized according to their wavelength in a vacuum. Most "single wavelength" lasers actually produce radiation in several modes having slightly differing frequencies (wavelengths), often not in a single polarization. Although temporal coherence implies monochromaticity, there are lasers that emit a broad spectrum of light or emit different wavelengths of light simultaneously. There are some lasers that are not single spatial mode and consequently have light beams that diverge more than is required by the diffraction limit. However, all such devices are classified as "lasers" based on their method of producing light, i.e., stimulated emission. Lasers are employed in applications where light of the required spatial or temporal coherence could not be produced using simpler technologies.
What to expect
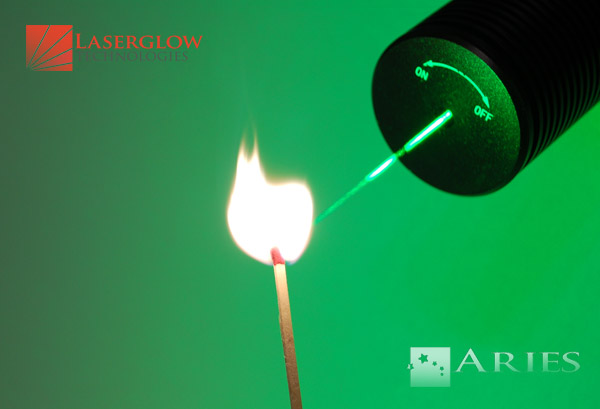
Here's a video I made of the two lasers I built recently. They can make holes in a piece of paper, can pop a balloon, ignite matchsticks, melt duct tape, etc.
That is what you should expect to be able to build after reading this guide. Looks fun? Okay, keep reading.
The extremely easy but pretty expensive way
This is cheating - you're not building a laser, you're just buying one made by someone else. It's also probably one of the most expensive ways, but the effort is minimal.
There are plenty of websites that will sell you a laser ready to use. Here's a short list:
Wicked Lasers
Nova Lasers
Laserglow
A few details to keep in mind:
Things get really interesting if the laser power is 100 mW or more. Less than that, and it's pretty hard to burn or ignite objects.
At the same power, green lasers appear much brighter to the human eye than red or blue. So, if you want a laser that looks very powerful in addition to being very powerful, get a green one. But be prepared to pay a significantly higher price - green is expensive.
Prices will vary widely, but be ready to pay $200 for a red 100 mW laser, $300 for a blue one, probably more than that for a green laser. More powerful lasers cost more, less powerful cost less. A 500 mW green laser can be as expensive as $3000.
The easy and cheap way
Go on eBay and search for "laser module", "laser kit" or "laser diode". There are plenty of sellers who will provide you a full laser kit that you can assemble at home. This is the diagram of a basic diode-based laser:
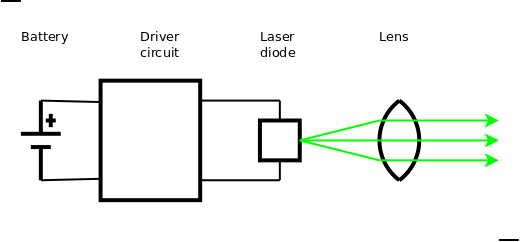
Typically, they will sell you the driver circuit, along with the diode encased in a small tube that contains the lens. Sometimes you can buy just the tube with the diode and the lens, and the driver circuit can be purchased separately.
In any case, make sure the lens can be adjusted. You may want to tweak the beam, focus it at different lengths, or make it parallel, which is not doable if the lens is fixed. Also, glass lenses are better, but more expensive than plastic; either one should work just fine for a small home-built laser like this.
The driver circuit needs to provide a fixed current (not fixed voltage, but fixed current) to the diode. The range for most diodes is between 30 mA and 250 mA. The bigger the current, the more powerful the beam, but the diode's life will be shorter. Most diodes, when fed 100 ... 150 mA, will produce a 100 ... 150 mW beam, which is plenty fun - also, that current level is acceptable for most diodes and won't make them die prematurely.
Most drivers are adjustable, and that's the kind you want, in order to tweak the current that goes to the diode. A digital multimeter, if you have one, would be very helpful here, as it will tell you exactly what's the current through the diode.
Of course, you can design and build the driver circuit yourself from scratch, if you have the knowledge. Something based on the LM317 circuit should be okay. Make it adjustable, and be sure to measure the current you're sending to the diode. Protect the output against spikes with an R-C circuit (10 microF and 1 k-ohm, or something like that) in parallel with the laser diode.
Currently (May 2010) you can buy a 80 ... 150 mW blue laser (405 nm) kit, including the diode+lens assembly tube and the driver circuit kit (parts and circuit board, including schematics, that you need to solder) for approximately $30 ... 35 on eBay from some sellers in Asia. You can probably find red laser (650 nm) kits even cheaper. Or you can buy just the tube with the diode and lens, and you can find the driver circuit on eBay or somewhere else already assembled, if soldering is not your thing, and it won't be much more expensive.
So, you don't have to be an electronics wizard to do this. If you buy a pre-assembled driver (something like $15 ... $20 online) you therefore skip the soldering part, and all you need to do is hook it up to the diode. Everybody can do that, right? :)
WARNING: Always first connect the laser diode to the driver, then connect the driver to the battery! Never connect the driver first to the battery - this will kill the diode! Laser diodes are not LEDs, they are very sensitive. Connect the diode to the driver and leave it connected forever, this is the only way to avoid mistakes. I burned a lot of diodes before I figured this out.
The somewhat harder but very cheap way
Some of the things I said above still apply - you still have to buy or build a driver circuit. But, instead of buying the laser diode, you can extract it from an old DVD or Blu-Ray writer.
"What? Does that mean I already have the diode somewhere in my house and I'm not even aware of it?"
That's right. DVD writers that can write disks at 16x speed or faster (that's writing speed, not reading speed) contain diodes usually at least 150 mW if not more powerful. A DVD writer will provide a red (650 nm) diode, a Blu-Ray writer will provide a blue-violet (405 nm) diode. All that's required is that the writer can still write disks. It doesn't matter if it makes a lot of coasters so it's time to retire it, all that counts is the raw burning power.
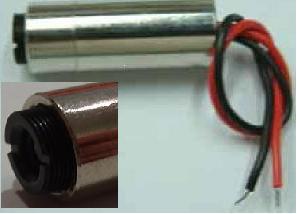
Most (but not all) diodes look like this:
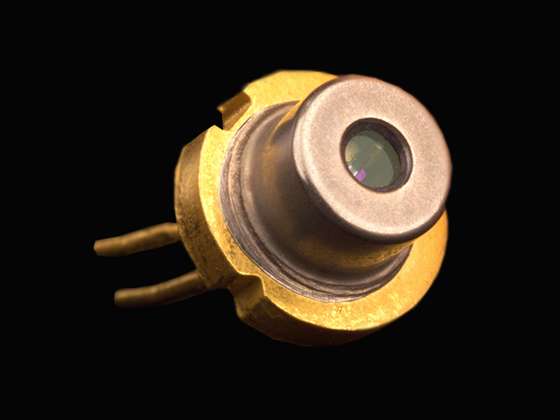
Some will lack the transparent window at the top (open-case diodes); some will lack the case altogether - those are more fragile and you can easily break them. The best ones are fully encased in metal, with a transparent window at the top, as shown above. They are very tiny anyway, smaller than a penny - be careful how you handle them.
So, just break the DVD writer open and rummage inside for the diode. I won't provide too many details, there are plenty of instructions online if you can't figure out yourself which one is the laser diode. Google it if you're lost. Also keep in mind: there are usually at least two diodes inside, and only one of them is the powerful laser diode used for writing. The other one might be a much weaker infrared diode used for reading - that's not the one you want.
Again, it has to be a DVD writer (not a DVD reader, not a CD writer, not a CD reader) at least 16x writing speed, or a Blu-Ray writer (not a Blu-Ray reader).
This is how to connect a red (DVD) diode to the driver:
This is how to connect a blue (Blu-Ray) diode to the driver:
Once you have the diode, connect it to the driver (pre-configured at 85 mA or something like that) and after that (not before!) connect the driver to the battery. The diode should be INCREDIBLY BRIGHT. If it's not very bright, if it's just like an ordinary LED, you broke it - you can toss it in the garbage can at this point.
To focus the beam, you can use an ordinary magnifying glass, and that should suffice for a few experiments. But there's a better way: purchase a laser lens tube assembly online, containing a much weaker diode, and swap the diodes.
There's a small company called AixiZ (I'm not affiliated with them in any way) who sells very small (5 mW) laser diodes (these are just like a laser pointer, very safe, but they can't burn anything) in a tube with adjustable lens, for a very small price - they are around $5 online or on eBay.
Buy one of these, very gently extract the small laser pointer diode, and instead install the more powerful burner diode. After that, just see above - connect it to the driver, set the current, enjoy.
Make sure to adjust the lens: focus the beam as small as possible at the distance you want to burn objects. The smaller the dot, the easier it is to burn. I managed to pop balloons, poke holes into paper, etc. with a 95 mW laser, but the beam was focused to the size of a pinpoint. Also keep in mind, if you focus it that small at, let's say, 50 cm from the lens, then it's only truly effective at 50 cm, no more, no less.
The very hard way
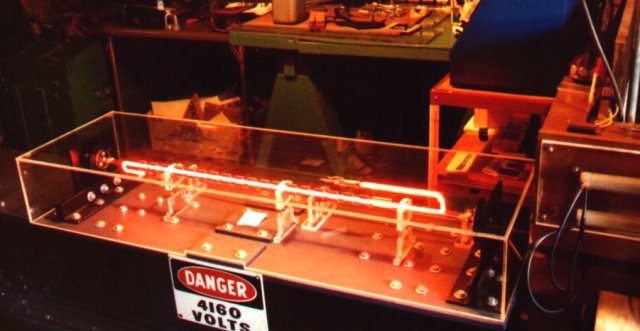
One could argue that even the previous method is "cheating", since you're not really building the laser diode yourself, you're just buying it or extracting it from another device. If you agree with that, a diode laser is off-limits - you can't make a laser diode from scratch in your garage. A gas laser is the only way.
This is a huge project. Essentially, you have to make a big glass tube like the ones used in neon signs, put it between two very special and very carefully calibrated mirrors, feed the whole thing with very high voltage (20 kV is common), and pray it works.
The gas inside the tube can be:
- a mixture of helium and neon (the He-Ne laser); this one generates an orange beam, is one of the easier gas lasers, was widely used before diodes took over
- mercury vapors (the Hg laser); makes a bright green beam, it's somewhat harder to trigger but the materials are easier to come by (a drop of mercury)
- nitrogen gas (the N2 laser); this is an invisible laser, ultraviolet, one of the easiest to trigger, but... well... it's invisible, so it's less fun
- carbon dioxide (the CO2 laser); also invisible (infrared), also easy to trigger, used by the military to make laser weapons
This is not for the faint of heart. It requires careful preparation, a pretty long execution time and, last but not least, the investment may not be trivial - you need a vacuum pump, you need to purchase the special mirrors, you need to make or order the special tube, you need a high-voltage power supply, etc. You can probably stay below $1000 if you know what you're doing, you're lucky, and you're good at dumpster diving, but expect to invest a few months of work anyway. If you're extremely lucky and extremely persistent, you can probably beg or dig up all the parts you need for next to nothing - so it's a balance between price and effort/patience.
I have not done anything like this. Back in high-school, I attempted to build a Hg laser, and failed when I couldn't procure the "magic mirrors". I would very much like to make this old dream come true. But it's a lot of work, so... we'll see. The little diode lasers I made so far are so much fun, so for now I'm satisfied.
Laser safety
A LASER THAT CAN BURN THINGS IS DANGEROUS!!!
Remember, you're not building a toy. This is a device that can do permanent damage to your eyesight and all it takes is a fraction of a second - faster than you can blink. Also, obviously, you can start a fire by mistake - the risk is small but not zero. The Wikipedia page on laser safety is very good, make sure you read it before you start working on this project:
http://en.wikipedia.org/wiki/Laser_safety
This is the bottom line:
Lasers below 5 mW are "class IIIa" lasers (or class II, or I). These are the laser pointers you can buy for $5 at the corner shop. They are not dangerous, you can play with them any way you like.
Lasers between 5 mW and 500 mW (the kind this document teaches you to build) are "class IIIb" lasers. Damage to the eye can occur pretty fast. It is recommended to wear laser goggles while working with such lasers.
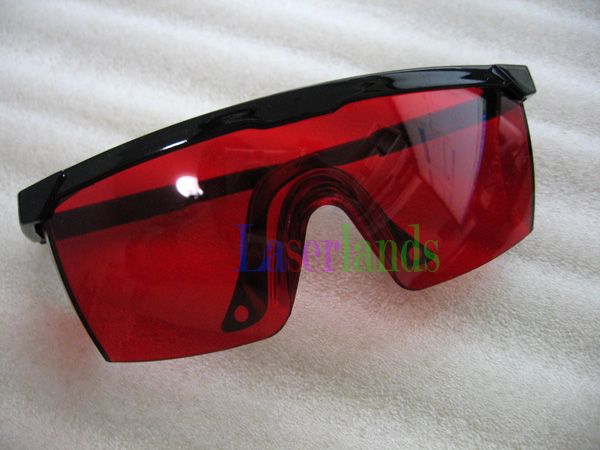
The goggles are fine-tuned to the specific wavelength of the laser. So, if you build a 650 nm red laser, you need to buy 650 nm goggles; for a 405 nm laser, buy 405 nm goggles, etc. The color of the right type of goggles will always be the complementary color of the laser, so for a blue laser the correct goggles will be orange-red, etc.
In any case, you can't replace the laser safety goggles with sunglasses or a welding mask or anything else. These goggles are fine-tuned devices, specifically made for one purpose only. Nothing else is effective, not even close.
The same sites that sell ready-to-use lasers usually will also sell goggles. See the links above. Or google "laser safety goggles" and choose your own vendor.
Don't shine the laser towards reflective objects - glass, metal, etc. In general, don't wave it around like a light saber, no matter how tempting that might be. Buy a green laser pointer (5 mW, class IIIa laser), and wave that one if you want, but a class IIIb device is not for foolish pranks like that.
When you're not using it to burn things, adjust the lens to de-focus the beam. If you shine it across the room on the opposite wall and the beam section is the size of a ping-pong ball at that distance, that means it's de-focused and mostly harmless. Remember, the more focused the beam, the greater the damage, so if it's de-focused like that the risk is greatly reduced (but not completely eliminated).
NEVER LOOK INTO THE BEAM!!! Never, ever. Goggles or not, de-focused or not, doesn't matter. If it's more powerful than a mere laser pointer, do not look directly into it, ever. If it's a "naked" diode without a lens that you extracted from a DVD writer, it's OK to watch it directly for a short while, just don't bring it too close to the eye. But, the moment you put a lens in front of it, it is forbidden to point the laser at the eye.
NEVER POINT THE BEAM AT PEOPLE!!! It's rude, dangerous, and it can get you in trouble with the law. Never point it at moving vehicles, airplanes, or even houses, etc. - if there are people inside, don't point it that way, it's that simple.
HOW TO BULID IT
Step 1: What do I need to build a laser?
Basically, you need:
laser diode (LD)
collimation optics
current regulator (aka driver)
power supply
heatsink
something to house all the electronics (project box is ok for a first build)
then you can add other optional things:
safety switch
LED for power indication
cooling fan
etc...Step 2: What tools do I need?
You need:
soldering iron
solder
DMM (digital multi meter, even the cheapest works fine)
some wires (the more flexible the better)
small pliers
other useful tools:
tweezers
vice
3rd handStep 3: Step 1: Gathering the laser diode
Here you have 2 options:
either to get a DVD drive for pc and extract only the diode assembly (aka sled).
or buy just the laser assembly from the internet.
You can get old DVD RW drives on ebay for >15usd, or just look around and ask friends if they don't have some old unused drives.
The another option is to buy just the sled ftom internet.
My favourite e-shops for laser components:
http://modwerx.com/shop/
http://hightechdealz.com/
http://stonetek.org/shop/
on these sites search for LPC-815, this is the most commonly used red laser (22x write speed).
What if I can't find the LPC-815, if I have only 20x or 16x burner, or if I'm not able to determine the write speed?
First, use google to find out something about your drive (search for part numbers from the label), this should bring out enough information. Remember the write speed.Step 4: Step 2: Collimation optics

 This is needed to make the actual laser beam. Without this lens, you would have just a very wide, useless spot.
The most common colimator is called Aixiz module, and it serves as the holder for both the diode and lens.
The diode is being press-fit into the module, using vice (see the pics).
You can buy it from the e-shops I mentioned in previous stepStep 5: Step 3: Driver

 What's this?
This is used to regulate the current flowing through the diode.
Do I need this?
YES! You must NEVER connect the LD directly to the power supply because it WILL die!
Can I just use a resistor?
Theoretically yes, but the current will not stay constant as the components heat up and the battery voltage decreases and this can shorten the diode's life.
But kipkay didn't use any driver...
Why do you think we have to deal with n00bs crying about their dead Laser Burning Flashlight Hack? (Just read the text above...)
UPDATE
A lot of people ask me about the diode's forward voltage stuff. This is a constant current driver. That means, it will adjust it's output voltage in order to keep the optput current fixed. So, it doesn't matter if you connect a red (2.2V), IR (2V), 405nm or a 445nm (>4V), as long as your power supply's voltage is above the diode's voltage + 1.5V, your laser will be running fine at the set current.
Also, the answer to question: "What voltage is diode XY?" can't be answered directly. Every diode's forward voltage (Vf) depends on her type and on the current. For example, a LPC-815 has Vf from 1.8V up to about 3.2V, as the current increases. Every diode has a PIV plot, which describes it's dependancy between the current, optical power and voltage. Google your diode's PIV plot, such as "LPC-815 PIV" or "22x red PIV" and so on.
Since we're building a red laser here (based on LPC-815), here's the PIV plot for LPC-815: http://www.diy-lasers.com/images/LEC_LPC-815-red.png
You can either buy one or build one (if you can)
the most common commercially sold drivers are:
http://www.modwerx.com/shop/laser-diode-drivers-test-loads-c-10/adjustable-laser-diode-driver-circuit-assembled-red-or-blu-ray-p-8?zenid=heee48kk0ak9008r2v8oo60cn7
and
http://laserpointerforums.com/f64/lava-micro-flexdrive-driver-lavadrive2-fits-pens-22502.html (usage instructions: http://hacylon.case.edu/ebay/laser_diode/MicroFlexDrive_V5_manual.pdf)
The most common DIY driver is called DDL driver and it uses LM317 as current regulator.
you will also need a thing called TEST LOAD, which consists of 4 1N4007 diodes and 1 1ohm resistor wired in series (check the pics). To use it, connect the output terminals of driver to test load (+ on the diode's anode, - to the resistor) and measure the voltage across the resistor. With 1ohm resistor, 1mV of voltage equals to 1mA flowing through the setup. Now rotate the small potentiometer, until the DMM reading matches your desired current.
recommended currens for various diodes:
16x...200-250mA...<200mW
22x...300-400mA...250-300mWStep 6: Step 4: Power supply

 Most beginners use 9V battery to power their first build, but 9V batteries have very small capacity and can't supply high currents (>350mA) for long times. Laser with 9V
battery at 350mA will burn for the first 60 seconds or so and after that the laser stays at <100mW and can't burn anything.
Now you must decide, if you want to build a portable laser or "labby" style, which just sits on the desk, powered by wall PSU.
The second option is easier, any wall PSU that puts out at least 8V at 500mA
If you want a portable build, the best option is to use Li-Ion batteries. The most popular are the 18650 's, but there aren't any battery holders for 18650, so easier is to use
14500 (AA size) or 10440 (AAA size), which can be used with standart AA/AAA holders. Don't forget to buy a proper charger .
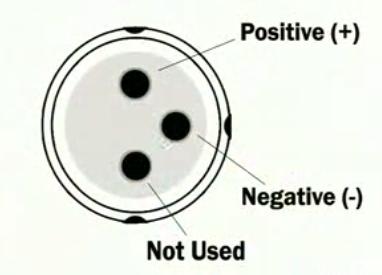
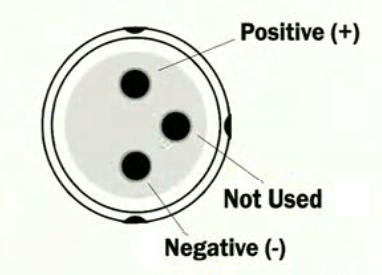
Now, just connect it together using the schematic below. Pay attention to the pinout, if you connect it wrong, the diode WILL dieStep 7: Step 5: Final phase


The last thing you need (or you should have) is the heatsink. Just find some small heatsink (good heatsinks are usually inside old CRT monitors), on which you can easily mount your laser module. Thermal epoxy (like Arctic Silver) is your friend :)
Or you can buy this one: http://www.laserlands.net/heatsink-12mm-yh.html
Now, let your imagination take over and build all this stuff into some nice project box.Step 8: And what now?


 StuartB446 months agoI did'nt see it mentioned anywhere about keeping the tab on the LM317 away from the laser diode case.
The tab is connected to the Positive Output of the 317 and the laser case is Negative/Ground. If they touch you would get a short circuit.
In one of your photos it looks like they are touching each other. 6 months agoYes, that's right. It's not shown very well in that photo (step 7, photo 2), but the LM317 is actually insulated by a heat sink gasket and the bolt also has an plastic insulating washer.
6 months agoOk 3zuli. Thats good to know.
6 months agoI'm trying to reproduce the laser driver. It turns on but the laser doesn't burn anything.
6 months agoYes, that's right. It's not shown very well in that photo (step 7, photo 2), but the LM317 is actually insulated by a heat sink gasket and the bolt also has an plastic insulating washer.
6 months agoOk 3zuli. Thats good to know.
6 months agoI'm trying to reproduce the laser driver. It turns on but the laser doesn't burn anything.
The design is the same and the laser switch on and it can get to 240mA. If I change the 2 resistors (10ohms) for 3 I can have 350mA. Even like that It doesn't burn... :(
My AIXIZ module is this
Thanks for any help
6 months agoIf you're sure that you used a diode from a DVD-RW drive (not a DVD-ROM, those don't have enough power), then it looks like the diode is damaged. It could have been either mechanical or electrostatic damage (ESD) during removing the diode from the drive, ESD or overheating during soldering, or the initial current was simply set too high and it destroyed the diode. After any of those events, the laser diode breaks down and keeps operating as a LED diode, but has minimal output power, so that's why it doesn't burn anything. Just get a new DVD-RW drive (or just the laser assembly itself) and try again, eventually you'll get it right :)
2 years agoHi,
can someone help me here please ?
I had 4 red laser diodes form DVD readers/burners. I used exacly this LM317 driver
http://laserpointerforums.com/attachments/f44/33304d1308798339-small-modification-lm317-drivers-driver-250ma-out.jpg
connected to 7.5V 1.5A power supply.
I set the driver to produce around 60mA. All 4 diodes were OK. The problem was all 4 diodes after 20sec just reduced their brightness for around 10%. After 2 diodes i thought the diodes just getting damaged from heat. But i tried to hold the third and fourth diode in hand without heatsink and they weren't even heating ! And same thing happened.
This issue is permanent for the diodes and it happened to me also with more powerful IR diode.
Any ideas ?
Thanks a lot ! 9 months agoYou must know the operational power of the diode and adjust control circuit accordingly.
When you slightly damage laser diode, it starts to function as a normal LED (it becomes trash). Perhaps that is what happened to you and you didn't notice heat output after.
Also LM317 adjusts voltage so that correct current flows through and if diodes's resistance went up, LM317 could've run out of input voltage (diode demanded more than 7.5V - 1.7V [Lm317 takes that much for itself]).
9 months agoYou must know the operational power of the diode and adjust control circuit accordingly.
When you slightly damage laser diode, it starts to function as a normal LED (it becomes trash). Perhaps that is what happened to you and you didn't notice heat output after.
Also LM317 adjusts voltage so that correct current flows through and if diodes's resistance went up, LM317 could've run out of input voltage (diode demanded more than 7.5V - 1.7V [Lm317 takes that much for itself]). a year ago60 mA is probably not enough to power your diodes. The current may differ between diodes, so check the datasheets.
 a year agoI know almost nothing about lasers but maybe the voltage they were getting was too high
 10 months agoGreat job man! hope you keep it up
a year agohi
10 months agoGreat job man! hope you keep it up
a year agohi
how to connect three legs of VR
thanks
2 years agoHi, This is the "Sony DVD-RW : DRI-190A" laser part which wirtes DVDs on 20x, i want its laser for using in mini CNC machine, but there is two laser diode in this model, i cant distinguish which one should i use, and i dont know about the model of laser diode too, any idea?
Left one, or Right one?
<I know i can test them and select the stronger one, but i just wanted your ideas>
 2 years agojust for clarification, how is the test circuit suppose to be used? just hook it up the the driver circuit to check the resistance right?
2 years agohello sir ,
2 years agojust for clarification, how is the test circuit suppose to be used? just hook it up the the driver circuit to check the resistance right?
2 years agohello sir ,
i am working on same project
i used dvd rw laser for my project. I follow the circuit diagram given above but laser is not upto the mark not focus and not burning paper or any other things. Is this problem is due to lens that i havent used yet or any other thing ?
plz help
2 years agoYou need to use a focusing lens in order for the laser to burn stuff. Otherwise you just get a wide beam which is very weak. 2 years agoI Made it! Actually I made all this laser using a NDV 4542 405nm diode at 120mA using this driver. I also made gerbers (PCB schematic) for this driver and uploaded it in this comment.
You can see my build (CNC Laser Engraver) in my profile.
2 years agoYour LM317T schematic is WRONG, my friend!
http://vakits.com/sites/default/files/imagecache/p...
Middle leg is the output leg.
2 years agoThis schematic is OK. Your schematic is the LM317 as a constant voltage source, which can not be used to drive laser diodes.
In this case the LM317 is connected as a constant current source: http://www.ae5d.com/images/Lim.png
The current goes from the OUT pin, passes through the resistors creating a voltage drop, which is then sensed by the ADJ pin and compared to the internal 1.25V reference. LM317 will adjust its output voltage to get 1.25V on its ADJ pin, which in this connection results in a constant current supply.
2 years agoI'm looking to purchase a lazertag system to start a lazertag business,
would you be able to produce or lead me to the guns and equipment I need
that would be safe and certifiable, that would be a cheaper option than
the $600/gun price range that I've seen advertised by the lazertag
manufacturers? email if so at ulrichinvesting@gmail.com
2 years agoThis is the cheapest lasertag I know about: https://www.kickstarter.com/projects/skirmos/skir...
http://www.skirmos.com/index.htm
It will cost $119 per gun (DIY kit), but it's still in development. However if you want to make a business, I would rather rely on ready-made lasertag systems which are already certified, reliable and safe to use. As a lasertag business, the last thing you want to deal with are blind customers.
5 years agoPLZZZZZ clarify my doubts
1>want to know that if I use Li-Ion batteries i.e; 18650 which are 3.7v 2600maH,then I have to use 3 of them connected in Series is that right(about 11.1 v )(since the total consumption will be about 7.2v),but these batteries comes with pcb protection so when I will be using this laser will the pcb should posses any problem.Secondly want to know that if this driver can handle 2600mah.
2>Then in case 14500 which is standard AA(1.5)then have to use 5 of them I guess,plz clarify if I am right or wrong.
3>Can u plz give the names of the chargers which charges these batteries,1 by 1 charging will not be a problem for me.
4>plz suggest the best lion battery manufacturers. I went to this site(http://www.candlepowerforums.com/vb/showthread.php?257543-LiIon-18650-battery-comparison)but cant decide which one to purchase.
Thankx in advance
5 years ago1. what diode are you using? because for red or IR laser 2 LiIon's are enough, but for bluray or 445nm you need 3 batteries. Also, don't forget to properly heatsink the LM317, it will get toasty ;) The protection PCB is mostly your friend, it just monitors the battery and keeps it from under- and overcharging and disconnects the load, if the current is too big. The 2600mAh number is the capacity of battery, the higher, the better - the more power can be stored inside and the longer is the runtime.
2. 14500's are 3.7V LiIon's too, so you have to use 2 or 3 of them
3. I'm using this one: http://www.dealextreme.com/p/trustfire-tr-001-multi-purpose-lithium-battery-charger-12594 It's a bit slow but works, this one is quick charger (and can fit some bigger batteries too): http://www.dealextreme.com/p/ultrafire-wf-188-rapid-charger-for-3-2v-3-7v-lithium-batteries-100-240v-44091
4. You don't have to use those $15 AW IMR batteries, in fact those cheap 18650's and 14500's I linked in this step are good enough (I'm using both, drawing 1.5A from 18650 and 0.8A from 2 14500's in series and they preform well)
hope I helped you :)
2 years agoI'm looking to purchase a lazertag system to start a lazertag business,
would you be able to produce or lead me to the guns and equipment I need
that would be safe and certifiable, that would be a cheaper option than
the $600/gun price range that I've seen advertised by the lazertag
manufacturers? email if so at ulrichinvesting@gmail.com 2 years agocan I use the G9105 regulator???
2 years agoG9105 is a 5V fixed voltage regulator. I've seen some people build laser drivers using fixed regulators, but I don't think it's the best idea. Adjustable regulators such as LM317 are way better for this. If you are interested in the low dropout voltage, try the LM1117 which is a low-dropout variant of LM317.
2 years agoI cant get a 35mw laser diode burning with the standard laser circuit ie.9v lm31t.
2 years agocan I use the G9105 regulator???
2 years agoG9105 is a 5V fixed voltage regulator. I've seen some people build laser drivers using fixed regulators, but I don't think it's the best idea. Adjustable regulators such as LM317 are way better for this. If you are interested in the low dropout voltage, try the LM1117 which is a low-dropout variant of LM317.
2 years agoI cant get a 35mw laser diode burning with the standard laser circuit ie.9v lm31t.
what could the problem be?
2 years ago35mW is not enough for burning. Generally you need at least 100mW to burn stuff, so I recommend you to buy a stronger diode.
3 years agofor metal cutting what i can do...?
3 years agoHi, I want to build a ~150mW 532nm green laser, but am not quite sure how to.
I have a flashlight housing with 2x 3.7V batteries, which i bet I can fit the laser into
I want to buy all the pieces online so that I can assemble the laser when they arrive,
but seems like no one is selling a laser diode nor driver,
I am want to spend <35$,
is this possible? if so, can you reffer to a ebay seller, or maybe share some links?
3 years agoThis is not possible for < $35 (unless you get the module as a gift from someone :D ). Just the laser module will cost you $40-50, for example this one: http://dx.com/p/200mw-532nm-green-laser-module-3v-11-9mm-26891?r=93098389 , which should output 100-150mW.
These modules can't handle 2 3.7V batteries, so you can either replace the original driver with one that can run from 7.4V, or you can build a spacer that will fit inside the battery tube and will replace one of the batteries, so that you only get 3.7V. It's also recommended to connect a diode (1N4007) in series with the module, because some modules might get burned from fully charged LiIon cells (4.2V) and the diode reduces the voltage by about 0.6V.
I recommend you to go to laserpointerforums.com and view the Green lasers section and try searching for "green laser tutorial" or so, I am sure you will find lots of informaton and ideas for your build :)
4 years agowhat is the voltage & Amps of a red laser diode?
(I am using a 22x HP DVD R\W Drive red laser diode...)
4 years ago16x...200-250mA...<200mW
22x...300-400mA...250-300mW
Start at 300mA to be safe.
4 years agoplease tell me the voltage of laser diode
3v,
4v
or +7.2V
4 years agowhat diode are you using?
4 years agoplease tell me the voltage of laser burner
5 years agohi there
i did every thing as you did but i can't get the laser to burn, could you please help me? i used the same parts (laser diode, parts for the driver).
5 years ago1. what PSU are you using?
2. is the laser focused?
5 years agoI am using a dell PS-5161-1D PSU
Output: at 5V, max 11A, 85W max
at 12V, 9A max, 160W max.
i have tested at both voltage. and the beam is focused 5 years agodo u really need to use a module?
5 years agowell, you don't have to, but it's just so much easier to use one, and they are pretty cheap (around $4)
5 years agodo u really need to use a module?
5 years agowell, you don't have to, but it's just so much easier to use one, and they are pretty cheap (around $4) 5 years agocan i use the power from a tomcat torch and/or a 3v power suply?
5 years agocan i connect a 3v power supply to my diode without anything else mabey a diode?
5 years agoSorry, but I have one more question. When measuring the voltage to adjust my driver's pot, should the power supply be on? I imagine it should, but I just want to make sure since the power supply comes in the step after you adjust your driver. Maybe I worry too much, but I don't want to fry my diode. :)
5 years agoof course, the power supply has to be powered on while adjusting the current
5 years agoYea, that was a little stupid of me. Just making sure.
5 years agoI have been looking for a resistor for the test load. I found over a hundred 1 ohm resistors on digikey, and I'm kinda confused. Could you give me some more info on which to use, or does it not matter for this application as long as it is 1 ohm?
5 years agoyou should use a resistor that is rated for at least 1W of power. the common 1/4 or 1/2W resistors can't handle bigger currents. so get a 1ohm 1W (or any higher wattage)
5 years agoThank you!
5 years agothankx 3zuli again
5 years agocan i use the power from a tomcat torch and/or a 3v power suply?
5 years agocan i connect a 3v power supply to my diode without anything else mabey a diode?
5 years agoSorry, but I have one more question. When measuring the voltage to adjust my driver's pot, should the power supply be on? I imagine it should, but I just want to make sure since the power supply comes in the step after you adjust your driver. Maybe I worry too much, but I don't want to fry my diode. :)
5 years agoof course, the power supply has to be powered on while adjusting the current
5 years agoYea, that was a little stupid of me. Just making sure.
5 years agoI have been looking for a resistor for the test load. I found over a hundred 1 ohm resistors on digikey, and I'm kinda confused. Could you give me some more info on which to use, or does it not matter for this application as long as it is 1 ohm?
5 years agoyou should use a resistor that is rated for at least 1W of power. the common 1/4 or 1/2W resistors can't handle bigger currents. so get a 1ohm 1W (or any higher wattage)
5 years agoThank you!
5 years agothankx 3zuli again
Actually lilbit confused of what axis module to purchase,in axis store I saw various 12*30mm modules but these have different specs ie,
1>AixiZ 120° Line Generator for 12x30mm Housing
2>AixiZ 38° Line Generator for 12x30mm Housing
3>AixiZ 60° Line Generator for 12x30mm Housing
4>AixiZ 89° Line Generator for 12x30mm Housing
5>AixiZ 9mm Cross Hair Lens for 12mm Casing
donno which one to purchase so that I get a maximum burning with LPC815 Red Laser Diode.About This Instructable
261,713views278favorites
License:


